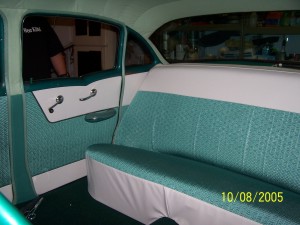
The new door panel looks so good that the old interior
from the '80s looks really bad now. But amazingly, the cloth that we
used in the '80s was very close to the original cloth.
|

The rear seat side panel fit great.
|
 
However, we thought the side panel didn't look quite right. The we realized
that this was wrong. The top half should have been covered with the
headliner material. CARS Inc sent extra material with the headliner,
so Kurt fixed the side panel.
|

Ok, one word of caution. Never throw out the old interior until you are
sure that you haven't missed any pieces. We almost missed the sailboard
cardboard inserts for between the rear window and the back side glass.
As it was, one disintegrated and had to be replaced. We replaced
the other as well. The replacement cardboard didn't come in the interior
kit, so we improvised
and covered
with the provided extra headliner material.
|

The headliner and sun visors arrived next.
|

We weren't sure about the light green color, but once installed they looked
great against the light green headliner.
|

Installing the headliner was actually easier than it looked at first, until
it came to pulling and stretching out the wrinkles.
|

We managed to pull the headliner tight enough that we didn't need any steam
to remove the wrinkles.
|

Oops, mistake number two. We plan to put a CD stereo system under the front
seat, so we had ordered the extra length of carpet to cover the soundproofing.
CARS forgot this.
|

But they sent us a separate piece later to fill the gap. At least we won't
have to worry about the soundproofing tar sticking to the stereo now.
|

One of my personal finishing touches is the Body
by Fisher stainless door sill strips. We left the blue plastic protective
cover on until after the seats were installed to help prevent scratches.
|

The back of the rear seat had exploded over time and we weren't sure
why. Once we removed the cover we found that the original paper wrapped
cord that held the burlap to the frame had disintegrated. Kurt got
creative on the replacement. He used small leather bands to hold
the frame together. They should last longer than the original cord.
|

We were on vacation when the seat covers arrived and were in the process
of building a garage to keep both of our '56s in immediately after
vacation. The seat covers sat for almost a month before we could start
upholstering the seats and installing them in Betsy.
|

We covered the rear seat first, after we purchased the replacement foam.
There wasn't enough of the batting left for the back to work with.
Betsy is really starting to look finished now.
|

Again, our friends helped out with the interior. Sometimes I think they
had as much fun as we did working on Betsy.
|

The bottom of the front seat looks great. However, problem number three
arose with the back of the front seat. The order had been placed
as "replace the ivory vinyl with white", but someone also replaced
the green vinyl on the back of the front seat with white vinyl! It
looked strange and didn't keep with the overall scheme. A phone call
to CARS and they took care of the mistake. Unfortunately, we had
about a month delay.
|

The front seat arrived on November 3rd and we didn't waste any time.
We recovered the front seat shells, adding a thin layer of padding
to hide the staple marks. The front seat still has some of the original
'50s batting, the replacement '80s batting, and a few spot repairs
for good measure.
|

An almost finished interior! What's missing you ask. The interior window
trims are still original 1956 green paint. We ran out of good weather
for this year. My Christmas list this year includes four new rims,
which will need to be painted, so the window trim pieces will have
to wait until spring.
|