Original 265 V8 number matching engine, although
it was been rebuilt in 1985 and #1 cylinder was sleeved again in
1987 due to a cracked piston skirt. But it was painted Chevy Orange
instead the proper red for 1956.
|

We had heard too many stories of shocks punching holes through weak floors, so
we added the shock mount bar early on to prevent this. Betsy had a weak floor!
|

A wooden lift was made, using ratchingtrailer
straps to raise the body off the frame. It worked wonderfully.
|

Typically, the frame is coated in rust.
|

Driver side rear bumper mount is rusted and
has to be repaired.
|

Fortunately, the passenger side was in great
shape.
|

The frame is loaded and ready to go to Fredericksburg
Powder Coating. Say bye-bye to rust.
|

Powder coated frame. My dad visited once the
frame was done and decided that he had to powder coat the frame of
the jaguar he was starting to restore. It sure is pretty.
|
|
|
|
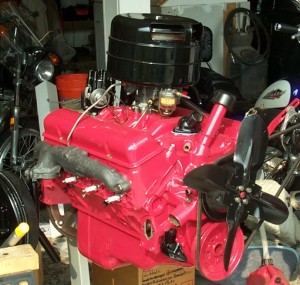
| Still the original 265 engine, numbers
matching. Thank you Fairfax Auto for the excellent rebuild. They also
installed new valve seals and lifters so that this old engine can run
unleaded gasoline. Yes, I kept the generator and original valve covers.
After so many years of seeing this car this way, I just can't change
it. Betsy will be close to stock when she is done. Now Kurt's '56 Wagon,
that's a different story . . . |

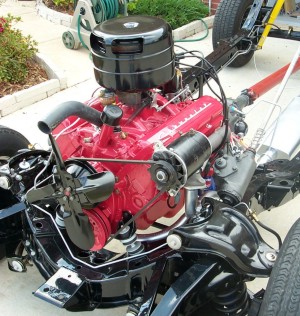
Rebuilt engine mounted on frame. The front
suspension has already been rebuilt with polygraphite bushings and
new coil springs. The mag wheels are on temporary loan from the Wagon
because Kurt stole Betsy's rims!
|

The undercarriage was detailed to semi-original
colors, although we put clear over everything to protect it. The
shocks are new Monroe's and should be the original spiral shocks,
painted black.
|

Close up of oil pan and frame detailing.
|

Undercarriage detailing.
|

Semi-original powerglide transmission. It's
not numbers matching, but who cares. After the original snapped a
washer and shelled in the 1980's, Dad had replaced it with the only
one he could find at the time, a Corvette powerglide. No wonder Betsy
always shifted so well!
|

Time for the body to go back on the restored
and finished frame. We used the same wood and strap system, but there
was a problem with this. As we started lowering the body in preparation
for rolling the frame underneath, one of the back straps missed the
catch and that corner of the body dropped, hitting the floor. It
was an accident, but caused *A LOT* of body tweaking in the rear
of the body. See body work for the repair job.
|
| |

Sloped driveways are fun when moving vehicles.
Kurt was the spotter, and our daughter got to help steer while friends
helped to push the rolling chassis from one garage bay, down the drive,
and back to the other bay under the raised body.
|

Lowering the body, slowly this time to avoid droppage.
|

The body back on the restored rolling chassis.
The wheel dollies were used to help position the frame at the right locations
for the body mount body to line up.
|

The first test drive of the new engine!
|

The help took a break to enjoy their handiwork.
|

My Dad came out to visit and the first thing
he had to do was work on the old Chevy again!
|

Over the winter, we couldn't do body work due
to the cold temps, so Kurt worked on other projects. The radiator had
several crushed in spots on the copper top that needed repair.
|

Using a propane torch, Kurt soldered small tabs
to the top of the radiator with silver solder. Then he used a slide
hammer to pull the dents out carefully. He had to move the tabs around
to work the dents out completely. The silver solder cleans off easily.
|